How to Set Up a Proxy on Android Wi-Fi

Table of Contents
Using a proxy server on your Android device can help you enhance privacy, bypass regional restrictions, or improve browsing speeds in specific situations. Fortunately, Android makes it simple to configure a proxy for your Wi-Fi network without the need for additional apps. Here’s a step-by-step guide to get you started.
Step-by-Step Guide
1. Open Wi-Fi Settings
Go to your Android device’s Settings and tap on Wi-Fi (1).

2. Modify Your Wi-Fi Network
- Tap and hold on the Wi-Fi network you’re connected to for a few seconds.
- A menu will appear—select Modify Network (2).
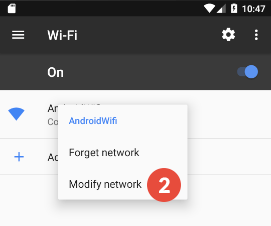
Modify Network

3. Configure Proxy Settings
- Scroll down and tap on Proxy (3).
- From the options, select Manual (4).
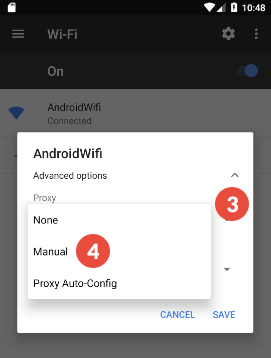
Proxy Settings

4. Enter Proxy Server Details
- In the fields provided, enter:
- IP Address (5): The IP of the proxy server you want to use.
- Port (6): The port number associated with the proxy server.
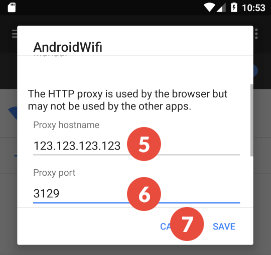
Proxy Server Details

5. Save Your Settings
Once the proxy details are entered, tap Save (7) to apply the configuration.
Important Notes
- Proxy IP and Port: Make sure you have the correct IP address and port number from your proxy provider.
- Wi-Fi Only: The steps above apply only to Wi-Fi networks. For mobile data, try changing Access Point Name settings.
- Test Your Connection: After setting up the proxy, ensure it’s working correctly by testing your internet connection or visiting websites.
Why Use a Proxy?
- Enhanced Privacy: Mask your IP address and protect your browsing activities.
- Access Restricted Content: Use proxies to bypass geographic restrictions and access blocked websites.
- Speed Optimization: Some proxies can cache data, reducing load times for certain types of content.
Setting up a proxy on your Android device is simple and doesn’t require any technical expertise. Whether you’re looking to improve privacy, access geo-blocked content, or test network settings, these steps will have you up and running in no time.