V2RayN Tutorial for Windows

Table of Contents
Introduction
In today’s digital age, ensuring your online privacy and security is more important than ever. A VPN (Virtual Private Network) allows you to encrypt your internet connection and browse the web anonymously. V2RayN is a powerful and flexible VPN client for Windows that enables you to connect to various servers with ease. In this tutorial, we will guide you through the process of downloading, installing, and configuring V2RayN to help you get started with your secure browsing experience.
Getting Started
1. Get Your V2Ray Config Ready
Begin by preparing your V2Ray config. It usually looks like this:

2. Download the V2RayN Client
V2RayN is the client you’ll use to connect to the VPN and route your internet traffic securely.
- Download the latest version of V2RayN from GitHub - V2RayN.
- After downloading, extract the zip file to a location you’ll remember.
Setting Up and Running V2RayN
1. Run the V2RayN Client
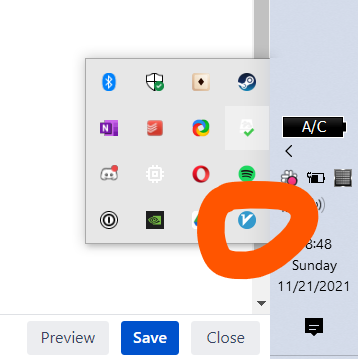
Navigate to the folder where you extracted the V2RayN files and double-click on v2rayn.exe to start the application. The program will launch and an icon will appear in your system tray.

2. Open the V2RayN Interface
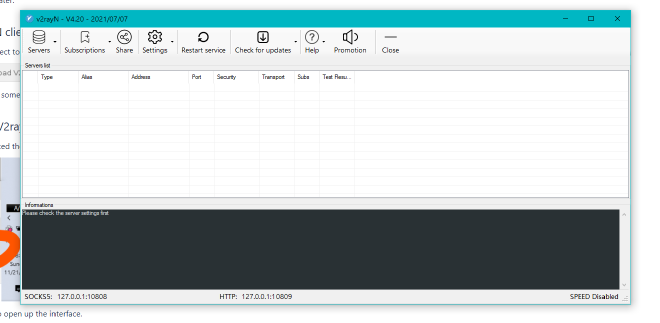
Double-click the V2RayN icon in the system tray to open the interface.

3. Add a Server
- Use Ctrl+V to paste the configuration you copied from your clipboard directly.
4. Select a Server
To connect to a VPN server, right-click the V2RayN icon in the system tray, then select the desired server from the list. If you only imported one configuration file, the server may already be selected.

Connecting to the VPN
1. Enable Connection
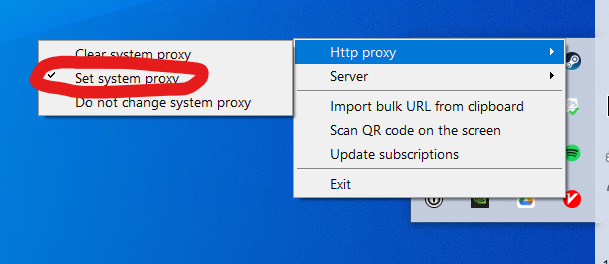
Right-click the V2RayN icon in the system tray again, go to the “Http Proxy” dropdown menu, and click on “Set system proxy.”

2. Verify Connection
Check that the V2RayN icon in the system tray has turned red—this indicates that you are successfully connected to the VPN.

You’re All Set!
Now your VPN connection is active, and your internet traffic is securely routed through the server you selected.
Conclusion
Congratulations! You have successfully set up and connected to a VPN using V2RayN on Windows. By following this guide, you can enjoy secure and private browsing, protecting your online activities from prying eyes. Whether you’re accessing geo-restricted content or simply want to enhance your online security, V2RayN is a reliable tool for your VPN needs. Stay safe and enjoy your newfound online freedom!